How to make two sprinkler valves VERY close together.
Requires a few special tools but makes for a very compact double 1" valve system. The idea of this assembly is to minimize the linear length taken for extra fittings, and have a compact unit with two valves, more or less doubling the performance of a sprinkler valve based launcher.
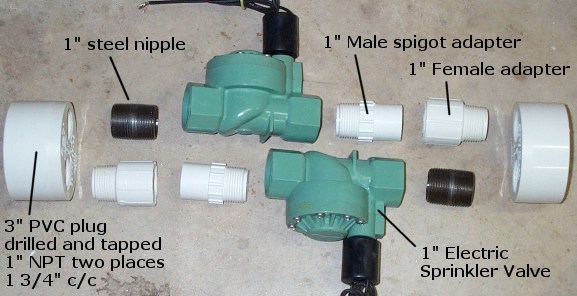
Above are all the parts you need, two of everything. Teflon tape also required, for sealing of threaded components. Not-so-common tools required are a lathe for cutting the plugs down to size, and removing the ridge, and a 1" NPT pipe tap. To use a tap this large an appropriate and significant restraint is required to tap the 1 1/8" holes precisely and parallel to each other. (See pics below for a close up of a tapped plug.) Tapped hole spacing is dependent on the specific brand and geometry of the in-line valve you might use; in some cases using a 3" plug may not even be possible due to an excessive center/center distance with the valves touching.
When you have all the parts in order, put an appropriate amount of Teflon tape on all threaded parts (5-6 turns), and begin assembly of the two halves. First assemble the nipple and sprinkler valve, without the female adapter yet, so you are able to turn the valve around to torque it. After the valve is tightened, then you can attach the female adapter, as it can be turned with channel-lock pliers or a small pipe wrench. Make sure the flow directions on the sprinkler valves will both be going in the same direction on a completed unit, so in opposite directions on each half made now. Picture with all of the threads just started, (shown below) but cannot tighten the valves to the plug with the female part in the way (I should have one more picture I suppose). Tighten each system so each half is of the same effective length.
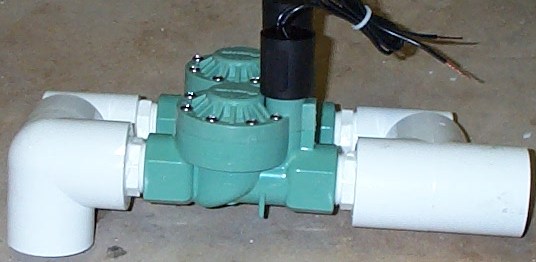
Now that everything is tightened....and you are pretty (VERY) sure due to your skilled craftsmanship it will not leak, proceed with the final [IRREVERSIBLE] part of the assembly: gluing the two halves together. Make sure the end of the spigot adapter 'pipe' has been broken off and smoothed nicely, as you will not be able to give the standard 1/4 turn upon assembly. Prime all four surfaces, then small amount of cement on female part, bunches on the spigot part, and push it together....viola! (3rd pic below) Make sure to keep it level to prevent glue from running into the sprinkler valves. A slight rotation may be necessary to square up both halves, taking out a little twist, but don't move it too much from the position it took by itself...as this is the most 'relaxed' and least stressful on the pipe fittings. If the holes were drilled and tapped precisely this should not be a problem.
Please note, if you ever need to take this apart, your best bet is to cut through the adapters, as they are the cheapest/most expendable parts so you can salvage the other parts.
Another method for getting two 1" sprinkler valves close together. Just some pictures. Made from a 1 1/2 x 1 1/2 x 1 1/2 three-way elbow and a 1 1/2 tee, 4 1 1/2 x 1 bushings, and 4 1" spigot adapters.
More pics below. (4 and 5)
More Pictures
document created 7/7/2002 4:24:58 AM;
last modified 8/29/2008 8:20:16 PM
| 
 Increase accuracy and safety with new rifled barrels!


